.webp)
1.FIRST STEPS
Congratulations on your purchase of the ELITE model GBT 750 circular saw blades grinding machine.
Read this guide before you start.
The GBT 750 is a manual grinding machine to repair or manufacture carbide-tipped circular saw blades from ø100 to ø850 mm.
It allows for precise and rapid grinding of tooth flanks to manufacture carbide-tipped circular saw blades or for tip replacements.
This manual introduces you to the main functions of the grinder in order to avoid risks to your health or that may cause a breakdown or premature wear of the machine.
In case of any doubt, please contact us directly or one of our authorized distributors.
Informative Note: The use manual of the circular saw sharpener described therein may present some variations in use as our machinery is subject to possible construction modifications, depending on the incorporation of technological advances in our sharpening equipment.
2.SAFETY
2.1.Safety regulations
Carefully observe and apply the following safety rules, not respecting these rules may cause personal injury or damage to the machine itself.
The installation and maintenance of the machine described in this manual must be carried out only by operators who are familiar with its operation and have sufficient technical knowledge.
The ELITE sharpening machines of the GBT 750 model range have been designed for the grinding of the sides of circular saws with carbide teeth, excluding any other type of operation.
DANGER HIGH VOLTAGE

DANGER OF ACCIDENT

DANGER DUE TO SPARK PROJECTION

WEAR PROTECTIVE SHOES

DANGER FROM SHARP TOOLS

USE HEARING PROTECTORS
These warnings do not include all possible risks that improper use of the machine could cause. For this reason, the operator must proceed with prudence and observing the rules.
2.2.Use and storage of the instruction manual
This instruction manual must be read and understood by all personnel who come into contact with the machine.
This manual is for:
- Indicate the correct use of the machine according to the type of work to be carried out.
- Provide the necessary instructions for the transport, adjustment and maintenance of the machine.
- Facilitate the ordering of spare parts and information of risks.
Limits of use of the manual:
The machine is intended for professional use and therefore the experience of the operator is required and of vital importance.
Importance and conservation of the manual:
This manual must be considered part of the machine and must therefore be attached to it until the end of its use.
Additional information and clarifications:
The user, owner or maintenance person can contact the manufacturer to request any additional information on the use of the machine and possible modalities for maintenance and repair intervention.
Expiration of responsibility:
The manufacturer is considered exempt from any liability in the event of:
- Improper use of the machine
- Use of the machine by untrained persons
- Serious failures in scheduled maintenance
- Unauthorized interventions or modifications
- Use of non-original spare parts.
2.3.Declaration of conformity
The company hereby:
Elite Sharpening Machines, SLU
Joan Oró, 27
ES-08635 Sant Esteve Sesrovires
Declares that the product indicated below, based on its conception and construction, as well as the version put on the market by our company, complies with the mandatory basic health and safety requirements of the CE directive.
This declaration loses its validity in the event of unauthorized modifications to the product.
Product name: Elite model GBT 750
Product type: Circular saws sharpening machine
Serial No.: __
EC Directive Competences:
- EC Machinery Directive (2006/42/EC)
- European directive on electromagnetic compatibility (2014/30/EU)
- The protection purposes of the CE low voltage directive (2006/95/CE) were fulfilled according to annex I, nr. 1.5.1 of the machinery directive 2006/42/EC
The technical documentation was compiled by legal representative of the documentation:
Sergi Valls Gramunt
Joan Oró, 27
ES-08635 Sant Esteve Sesrovires
Date / manufacturer - Signature: __
Signatory data: Sergi Valls Gramunt, manager
3.TECHNICAL DATA
In the following information table, find the list of technical specifications of the sharpener described in this manual.
| TECHNICAL DATA | GBT 750 |
|---|---|
| Saw blade diameter | From ø100 to ø850 mm. (4" to 33,5") |
| Saw blade hole diameter | From ø10 mm. (0,4") |
| Saw blade body thickness | Up to 8 mm. (0,31") |
| Tooth pitch | Any tooth pitch is possible |
| SIDES GRINDING | |
| Grinding path | Up to 40 mm. (1,57") |
| Rake angle | From -15º to +30º |
| Radial cutting angle | Up to +6º |
| Tangential cutting angle | Up to +6º |
| REFRIGERATION EQUIPMENT | Optional |
| Tank capacity | 220 liters |
| Coolant flow rate | Up to 40 liters/minute |
| TECHNICAL DATA | |
| Motor wheel | 0,75 kW |
| Wheel speed | 9000 RPM |
| Grinding wheel diameter | ø100 mm. |
| Grinding wheel hole diameter | ø20 mm. |
| Machine dimensions | 1570 x 1180 x 1780mm. |
| Machine weight | 470 Kg. |
3.1 TECHNICAL REQUIREMENTS
Connection voltage: 220-240V 2Ph 50/60Hz
Required connection power: 1.5 kW
3.2 EQUIPMENT INCLUDED
- Saw holder for saws with a diameter of 100 to 210 mm.
- Saw holder for saws with a diameter of 210 to 850 mm.
- Centering ring: ø30 mm.
- Grinding wheel holder for sharpening wheels.
- 3 mm. feed pawl
- Device for sharpening saws of equal diameters
- Prepared for connection to a machine filtration system or a centralized filtration system.
4.TRANSPORT
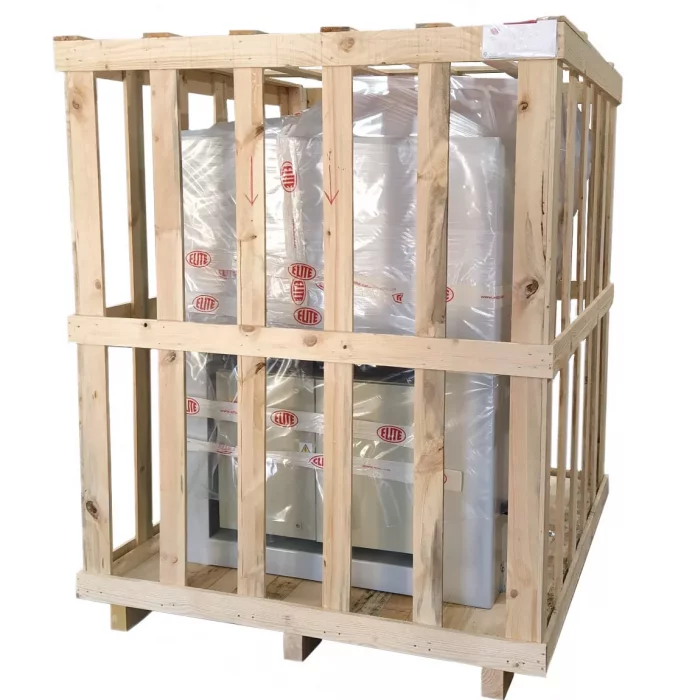
The ELITE GBT 750 is delivered packed in a wooden crate.
During all transport and transfer, the machine must be kept in its original vertical position, any variation in this position may lead to the loss of the guarantee.
| Machine model | Dimensions (mm) | Weight (kg) |
|---|---|---|
| GBT 750 | 1570 x 1180 x 1780 | 520 |
4.1.Instructions for unpacking and setting up
Take special care when lifting the load: The load may not be centered!
To lift or move the load, use a forklift with blades long enough to support the machine, taking into account the width and depth of the machine for the calculation of the weights to lift.
Once the packaging has been opened, remove the fixing stops from the feet of the machine
Before connecting the machine, remove any protection that the machine may have to protect the components during transport.
5.INSTALLATION
5.1.Machine placement
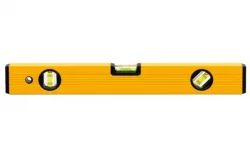
Before any work make sure that the machine is well aligned and does not oscillate at any of its ends, in which case it must be wedged to avoid movements. For its correct level it is necessary to use a leveling tool. This check must be carried out both longitudinally and transversally.
Poorly leveling the machine can cause unwanted vibrations and premature wear of the linear guides.
Remember: before connecting the machine, remove any protection that the machine may have to protect the components during transport.
WARNING: The machine must not be used under any circumstances by unqualified or unauthorized personnel.
For transportation, the grinding whee angle adjustment handle comes disassembled with the screws threaded into the destination hole. Assemble it.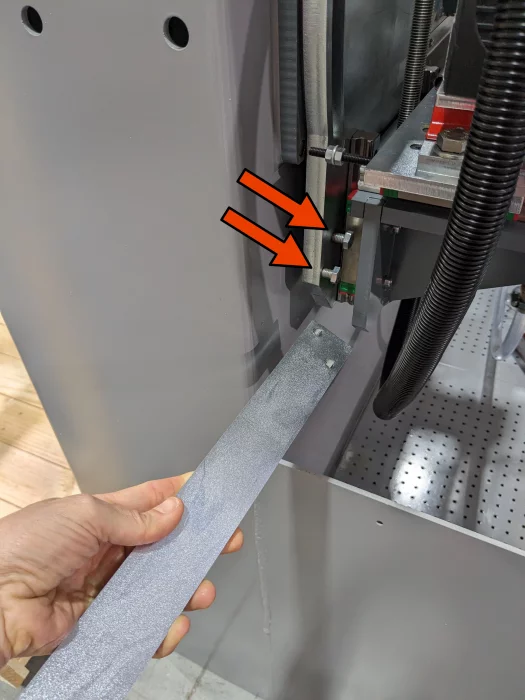
5.2.Electrical connection
DANGER HIGH VOLTAGE!
The electrical connection of the machine must be carried out by qualified technical personnel only at the voltage indicated in the machine order / machine identification plate.
For any doubt about the voltage, consult the manufacturer before the connection.
Any claim for an incorrect connection will be out of warranty.
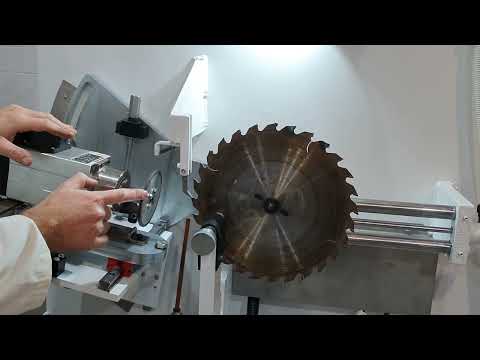
5.3.Main components of the machine
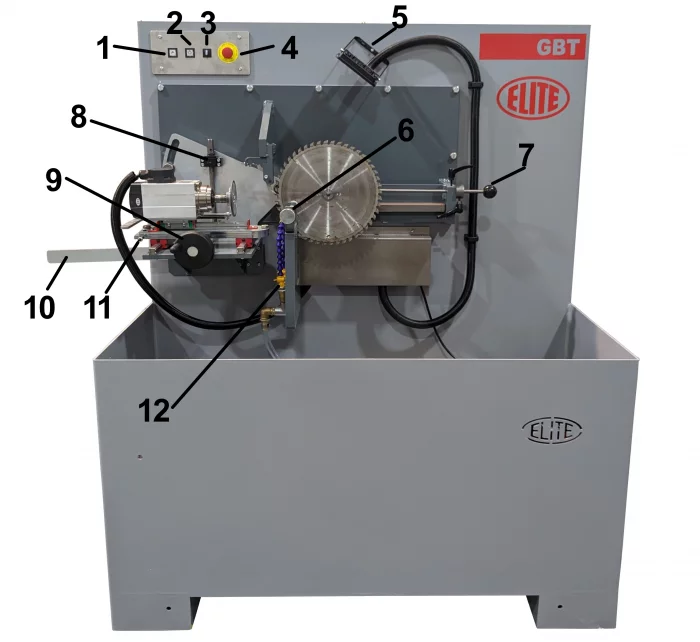
1.LED light on/off button
2.Coolant pump on/off button
3.Button to turn grinding wheel left or right
4.Emergency Stop Button
5.LED light lamp
6.Clamp to fix the saw.
7.Adjustable saw limiter
8.Grinding wheel height regulator
9.Grinding whee load and working side
10.Grinding whee angle adjustment handle
11.Trapezoidal angle adjustment
12.Coolant flow adjustment tap
13.Cooling pump
14.Coolant tank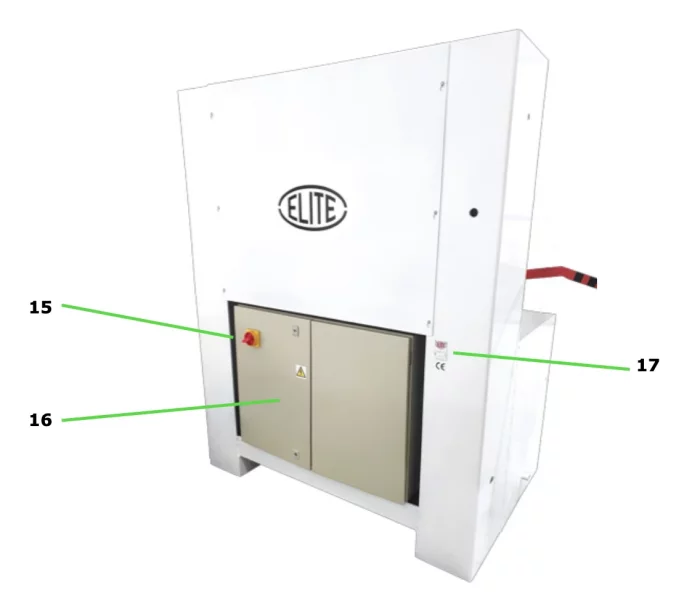
15.General machine ON/OFF switch
16.Electrical panel
17.Technical plate of the grinding machine
6.STARTING UP
In this section we show you to operate the ELITE GBT 750 in order to work.
NOTE: The data that appears in the different images are by way of example, each type of tool has its recommended data and a skilled operator must know them.
Emergency stop
It's the round red button. In the event that there is a failure in use or a dangerous situation is being created, it allows the immediately disconnection of the machine.
Should not be used unless strictly necessary.
Once used, to use the machine again, you must pull it to return to the initial position, additional referencing and setting up must be needed.
WARNING: Under no circumstances should this control be modified or manipulated, this automatically puts the operator and people around him in danger of serious injury.
Sharpening operation
To start the sharpening process, you must first make sure that the emergency stop button is not activated.
DANGER: never manipulate the buttons on the control panel while changing the abrasive wheel: danger of very serious injuries. It is highly recommended to switch off and disconnect from power mains the machine when working inside the machine.
WARNING: before start to rotate the grinding wheel make sure that it is well attached to the wheel holder where it is located and that NOBODY is manipulating in the area where it rotates. UNDER NO CIRCUMSTANCES SHOULD THE WHEEL BE STARTED WHILE SOMEONE IS HANDLING IT.
GBT 750 Set up

6.1.Preparation for the sharpening process
In this section we show you how the buttons on the ELITE GBT 750 control panel work.
NOTE: The data that appears in the different images is an example, each type of tool has its recommended data and the sharpening professional must know them.
1 Emergency stop
It is the red button located on the right side of the control panel, in the upper left corner of the machine. In the event that there is a failure in use or a dangerous situation is being created, it allows the automatic disconnection of the machine.
Not to be used unless strictly necessary.
ATTENTION: Under no circumstances should this control be modified or manipulated, this automatically puts the operator and people around him at risk of serious injury.
2 LED light on/off button
It is the first button on the control panel located in the upper left corner of the machine. This button allows us to turn on and/or turn off the light of the lamp with which the machine is provided to verify the result and quality of the grinding during the work process.
3 Coolant pump on/off button
It is the second button on the control panel located in the upper left corner of the machine. It allows us to activate the refrigeration equipment pump, starting the machine's refrigeration system.
4 Abrasive stone / sharpening wheel rotation selector
It is the third button on the control panel located in the upper left corner of the machine. It is used to activate the abrasive grinding wheel and allows you to select the clockwise or counterclockwise direction of rotation.
IMPORTANT NOTE: THE SIDE OF THE STONE THAT SHARPENS THE DISC SHOULD ALWAYS GO DOWNWARD to reduce the vibrations of the disc during the sharpening process and prevent the coolant from going up and splashing.
7. WORK OPERATION
How to grind the tooth flanks
7.1.Operation of grinding the flanks of the saws
To start the sharpening process, make sure the emergency stop button is not activated.
Preliminaries
Once the repair of one or more of the carbide teeth of the circular saw or the complete grinding has been carried out, it is necessary to grind the sides of the teeth, also called flank grinding.
When proceeding with the grinding operation, the operator must make sure if one or more teeth of the saw are crooked, otherwise the saw will splinter the wood. This can be verified using a tester on the side of the discs. With this instrument, we measure all of the teeth to find out which of them is misaligned. Once this check has been carried out, the teeth that are crooked must be marked and introduced into the flank grinding machine, reviewing them to leave them all at the same height or measurement. This is the procedure that allows us to solve this problem.
Placing the circular saw
In order to fit the saw blade on the grinding machine, use reducer rings. Once the ring is placed, the disc is magnetically fixed. Approach the saw blade as far as the end closest to the abrasive stone and so that it touches the feed finger of the saw.
Fixing the circular saw
Once the disc is conveniently placed on the grinding machine, squeeze the black handle located on the side opposite the motor of the grinding wheel/stone to ensure that the disc does not move during the grinding process.
Next to the handle mentioned above, there is an adjustable limiter whose function is to make series of discs with the same diameter so that they are exactly the same. Once the limiter is adjusted, be sure to secure the saw using the black way mentioned above.
7.2.Operation of grinding the flanks of the saws
Once the circular saw is fixed, bring the first tooth of the saw closer to the feeding pawl and to finish placing the circular saw, tighten the jaw located at the bottom of the circular saw.
Important observation: When the operator is going to configure the direction of rotation of the sharpening stone by using the button that allows such a function (indicated in the Main Components section 5.3), he must configure the direction of rotation of so that the stone rotates from the top to the bottom of the disc to prevent the coolant from splashing. For further illustrative details, see the general operation video of the ELITE model GBT 750.
7.2.1 Adjust the tooth angle of the circular saw
For this purpose, the grinding machine comes equipped with 3 verniers, whose functionality is described below (indicated in the Main Components section 5.3):
1.- Vernier of degrees: allows you to adjust the angle of attack of the disc.
2.- Vertical vernier: allows you to adjust the angle of cutting or lateral skinning of the disc.
3.- Horizontal vernier: allows you to give the trapezoidal shape that normal teeth have in circular saws or inverted trapezoid in the case of incisors.
To adjust the horizontal vernier, the operator must use a wrench to loosen the screw located above the vernier and move the head by the amount required by the disc.
Additional observation: Standard saw blades usually have a 0.75º angle. To know the exact angle of the circular saw to be ground, contact the manufacturer to provide you with the technical details of the saw blade.
Every 5 and a half turns of the horizontal vernier nut gives us 1º of the saw angle.
Once the required grade is set, tighten the locknut so that it does not move during the grinding process. Repeat the operation exactly with the other side of the vernier and with exactly the same turns so that the grinding is proportional.
We will carry out part of the grinding of the disc with this third vernier on one side and the other part with the vernier moved to the other side.
7.2.2 Adjust the tooth angle of the circular saw
If you do not know the angle of the tooth, it will be necessary to place a tooth that is well sharpened on the lead nail or, failing that, a new circular saw that has the tooth properly sharpened, and mark it with a marker to indicate it.
7.3.3 Grinding the teeth of the circular saw
Next, move the grinding wheel until it touches the selected tooth until you can see that the paint has been removed proportionally.
If only the paint has been removed from the upper part of the tooth, this will indicate that we require a greater removal angle. Consequently, it will be necessary to graduate this angle using the vertical vernier described above, until it can be seen that practically all of the paint marked with the marker has been removed. Proceed with the grinding operation on each of the teeth of the saw blade.
Once you have finished grinding a tooth, loosen the saw blade using the jaw located at the bottom of the blade to move the blade until the next tooth is placed on the feed finger. Before grinding the new tooth, as with the previous tooth, close the jaw to fix the saw blade in the support.
Proceed with this operation for all teeth. Once one of the faces is finished, using the manual handwheel located under the grinding wheel motor, move the stone to the other side.
At this point, you will need to remember to select the angle towards the other side. To do this, proceed as you did previously to adjust the angle of the first side so that the nut reaches the rear stop.
Next, move the feed pawl to the other side of the circular saw. This is possible because the feed claw is mobile. If it moves inwards, it will grind the external face of the circular saw and if it moves outwards, it will grind the internal face.
Once the angle has been adjusted on the other side of the circular saw, fix the saw using the clamp and repeat the process described above, until all the teeth of the saw are ground.
ATTENTION: before starting the grinding wheel, make sure that it is well attached to the axis where it is located and that NO ONE is manipulating it in the area where it rotates. UNDER NO CIRCUMSTANCES CAN THE GRINDING WHEEL BE STARTED WHILE SOMEONE IS HANDLING IT.
DANGER: never manipulate the control panel buttons while changing the grinding wheel, risk of very serious injuries.
8.MAINTENANCE
8.1.Preventive maintenance
The maintenance of the ELITE model GBT 870 grinding machines is very simple but at the same time important.
It consists of the following:
- Cleaning and greasing the polished parts, in case the machine is not used for several days, to prevent oxidation.
- Check the level of coolant in the coolant tank. You can use to refill the coolant the ELITE SintoCut PRO MIX. The coolant should be mixed with water between 2 and 8%. Being below it can lead to oxidation of mechanical parts and if the level is higher it can be toxic. - Monthly.
- The sludge and dirty that is deposited both in the work area and in the coolant tank must be emptied - Weekly.
- Keeping the machine clean and in good condition will allow for optimal long-term use.
Use the equipment only in dry environments. The temperature must be between 5 and 40ºC. A relative humidity greater than 90%, as well as a saline environment, would cause premature corrosion of the machine.
To lubricate the pneumatic circuit we recommend using Esso Spinesso oil
9.ACCESSORIES AND CONSUMABLES
9.1.Grinding wheels
For the grinding wheel use the ref. nr. 2310-A. 1A1 D107 C75 ø100x4x5x10xø20 mm.
9.2.Coolant agents
We recommend to use ELITE SintoCut PRO MIX or equivalent to mix with water emulsion. If you prefer to grind with oil, you can use our SintoCut PRO MD. Both coolant are available in 20 liters can or 200 liters barrel.
9.3.Equipment
Additional equipment of the machine.
9.3.1.Filtering systems
Machine could be equipped with one of the following ELITE filtering systems. If your machine already has one of this systems and you need information or help, please refer to the manual of the filtering system.
9.3.1.1.FILTRAmaq UNO
Filtering system integrated in the machine to save space.
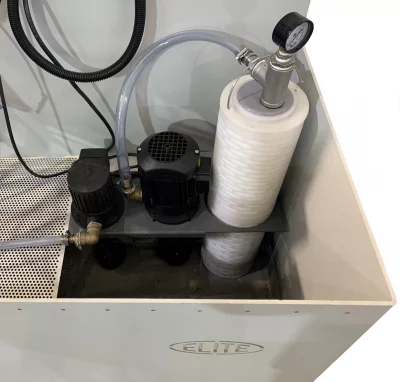
9.3.1.2.FILTRAmaq SOLO
Independent filtering system for one machine.

9.3.1.3.FILTRAmaq PRO
Centralized filtering system for up to 5 machines.

10.WARRANTY
All our machines are tested before being shipped. However, there can always be defects that are not observable at first sight.
Our machines are guaranteed against manufacturing or material defects under normal use and maintenance conditions.
The period of this guarantee is 12 months from the date of purchase and consists of the replacement of defective material.
The guarantee will be automatically canceled in the event of a modification outside our company. Or in manifest cases of misuse of the machine.
The guarantee does not include parts subject to normal wear due to use such as skids, lubrication cartridge, abrasives, etc.
11.PROBLEMS AND SOLUTIONS
In case of problems, read this section. Problems can be solved acting on different values:
- Excessively hard movement of the grinding wheel motor.
Solution: Check the condition of the motor bearings, they may need replacement.
- Excessive vibration of the grinding wheel.
Solution: Check that the grinding wheel and grinding wheel holder are correctly fixed to the motor.
NOTE: It is very important that when a new grinding wheel is mounted it is balanced.
- Corrosion on the machine or sharping tools.
Solution: Check the coolant level in the coolant. Also check that the water used is not excessively hard.
12.DOWNLOAD MANUAL
13.FAQ
Question nr1
Answer no. 1