
1.FIRST STEPS
Congratulations on your purchase of the automatic dual-grinding wheel circular saw blade grinder, ELITE model AVB 850.
Please read this guide before starting.
The ELITE AVB 850 model is our fastest grinding machine for both the face and the back of all common tooth geometries on carbide-tipped circular saw blades with diameters ranging from ø100 to 850 mm. The dual-grinding wheel system allows for complete face and back sharpening in a single setup: once the machine finishes sharpening the face, it automatically adjusts to sharpen the back, or once the back is finished, it automatically adjusts to sharpen the face. It comes equipped with 5 CNC axes for complete machining of all common tooth geometries in one cycle.
You can view the product catalog at the following link: ELITE model AVB 850
This manual introduces you to the main functions of the grinder in order to avoid risks to your health or that may cause a breakdown or premature wear of the machine.
In case of any doubt, please contact us or one of our authorized distributors.
Informative Note: The use described in the manual of this circular saw sharpener described therein may present some variations in use as our machinery is subject to possible construction modifications, depending on the incorporation of technological advances in our sharpening equipment.
2.SAFETY
2.1.Safety regulations
Carefully observe and apply the following safety rules, not respecting these rules may cause personal injury or damage to the machine itself.
The installation and maintenance of the machine described in this manual must be carried out only by operators who are familiar with its operation and have sufficient technical knowledge.
The ELITE sharpening machines of the AVB 850 model range have been designed for the sharpening of circular saws with carbide teeth, excluding any other type of operation.
DANGER HIGH VOLTAGE

DANGER OF ACCIDENT

DANGER DUE TO SPARK PROJECTION

WEAR PROTECTIVE SHOES

DANGER FROM SHARP TOOLS

USE HEARING PROTECTORS
These warnings do not include all possible risks that improper use of the machine could cause. For this reason, the operator must proceed with prudence and observing the rules.
2.2.Use and storage of the instruction manual
This instruction manual must be read and understood by all personnel who come into contact with the machine.
This manual is for:
- Indicate the correct use of the machine according to the type of work to be carried out.
- Provide the necessary instructions for the transport, adjustment and maintenance of the machine.
- Facilitate the ordering of spare parts and information of risks.
Limits of use of the manual:
The machine is intended for professional use and therefore the experience of the operator is required and of vital importance.
Importance and conservation of the manual:
This manual must be considered part of the machine and must therefore be attached to it until the end of its use.
Additional information and clarifications:
The user, owner or maintenance person can contact the manufacturer to request any additional information on the use of the machine and possible modalities for maintenance and repair intervention.
Expiration of responsibility:
The manufacturer is considered exempt from any liability in the event of:
- Improper use of the machine
- Use of the machine by untrained persons
- Serious failures in scheduled maintenance
- Unauthorized interventions or modifications
- Use of non-original spare parts.
2.3.Declaration of conformity
The company hereby:
Elite Machines, SLU
Joan Oró, 27
ES-08635 Sant Esteve Sesrovires
Declares that the product indicated below, based on its conception and construction, as well as the version put on the market by our company, complies with the mandatory basic health and safety requirements of the CE directive.
This declaration loses its validity in the event of unauthorized modifications to the product.
Product name: ELITE model AVB 850
Product type: Circular saws sharpening machine
Serial No.: __
EC Directive Competences:
- EC Machinery Directive (2006/42/EC)
- European directive on electromagnetic compatibility (2014/30/EU)
- The protection purposes of the CE low voltage directive (2006/95/CE) were fulfilled according to annex I, nr. 1.5.1 of the machinery directive 2006/42/EC
The technical documentation was compiled by legal representative of the documentation:
Sergi Valls Gramunt
Joan Oró, 27
ES-08635 Sant Esteve Sesrovires
Date / manufacturer - Signature: __
Signatory data: Sergi Valls Gramunt, manager
3.TECHNICAL DATA
In the following information table, find the list of technical specifications of the sharpening machine described in this manual.
| TECHNICAL DATA | AVB 850 |
|---|---|
| Saw blade outside diameter | From ø100 to ø850 mm. (4" to 33,5") |
| Saw blade bore diameter | From ø10 mm. (0.34") |
| Saw blade thickness | Up to 8 mm. (0.31") |
| Tooth pitch | Up to 120 mm. (4,72"). CNC controlled |
| TOP GRINDING | |
| Clearance angle | From +5º to +35º |
| Bevel angle | From -45º to +45º |
| Grinding path | Up to 25 mm. |
| Tooth shapes available | Flat (P) - Single bevel (L/H or R/H) - Alternate (AT) - Alternate bevel (HGB) - Pointed tooth (PTR) - Triple chip (TRZ) - Pointed and flat - Triple chip and flat (TCH) - Doble triple chip (D/T/C) - Combination (SLR) |
| FACE GRINDING | |
| Hook angle | From -10º to +35º |
| Grinding path | Up to 25 mm. (0.98") |
| Available tooth shapes | Flat - Single bevel (L or R) - Alternate |
| OTHER DATA | |
| Grinding wheel motor | 1,5 HP |
| Grinding wheel speed | Adjustable from 2500 to 5000 RPM |
| Grinding wheel diameter for top | ø125 mm. |
| Grinding wheel diameter for face | ø175 mm. |
| 5 CNC axis | A: Tooth pitch - B: Tooth cutting angle - C: Side angle of the tooth back - X: Sharpening load - Z: Sharpening path |
| Machine dimensions | 1650 x 1200 x 1900 mm. |
| Machine weight | 690 kg. |
3.1 TECHNICAL REQUIREMENTS
A 6 bar air connection is required.
Connection voltage: 220/400V 2Ph 50/60Hz
Required connection power: 1.5 kW
3.2 EQUIPMENT INCLUDED
- Double wheel holder for sharpening the front and back surfaces
- 3 mm feed dog
- Device for serial sharpening of equal diameters
- LED lighting of the work area
- Ready for connection to an ELITE FILTRAmaq individual filtration system or a centralized filtration system.
4.TRANSPORT
The ELITE AVB 850 is delivered packed in a wooden crate.
During all transport and transfer, the machine must be kept in its original vertical position, any variation in this position may lead to the loss of the guarantee.

| Machine model | Packing dimensions (mm) | Gross weight (kg) |
|---|---|---|
| AVB 850 | 1970 x 1480 x 2200 mm. | 780 |
4.1.Instructions for unpacking and setting up
Take special care when lifting the load: The load may not be centered!
To lift or move the load, use a forklift with blades long enough to support the machine, taking into account the width and depth of the machine for the calculation of the weights to lift.
Once the packaging has been opened, remove the fixing stops from the feet of the machine
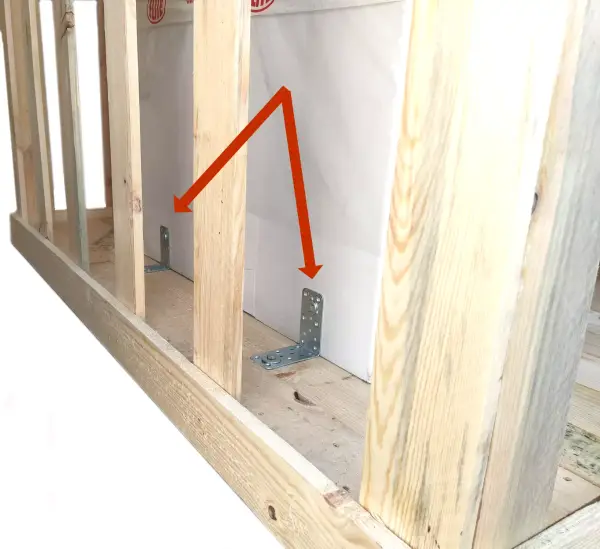
Remove protections before connecting the machine
5.INSTALLATION
5.1.Machine placement
Before any work make sure that the machine is well aligned and does not oscillate at any of its ends, in which case it must be wedged to avoid movements. For its correct level it is necessary to use a leveling tool. This check must be carried out both longitudinally and transversally.
Poorly leveling the machine can cause unwanted vibrations and premature wear of the linear guides.
Before connecting it, remove all packaging protections that the machine has for transport.
WARNING: The machine must not be used under any circumstances by unqualified or unauthorized personnel.
5.2.Electrical connection
DANGER HIGH VOLTAGE!
The electrical connection of the machine must be carried out by qualified technical personnel only at the voltage indicated in the machine order / machine identification plate.
For any doubt about the voltage, consult the manufacturer before the connection.
Any claim for an incorrect connection will be out of warranty.
5.3.Main components of the machine
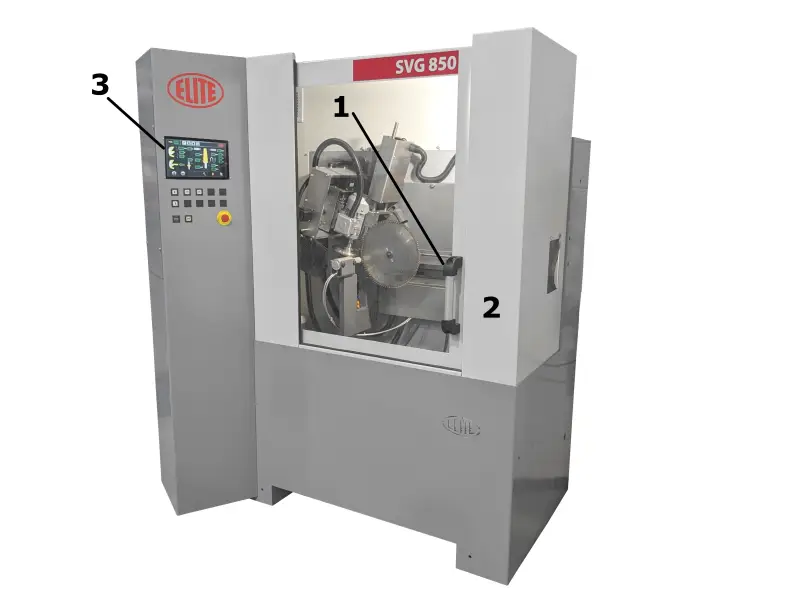
- Machine operation door.
- Full enclosure.
- Machine control panel.
5.4.Control panel
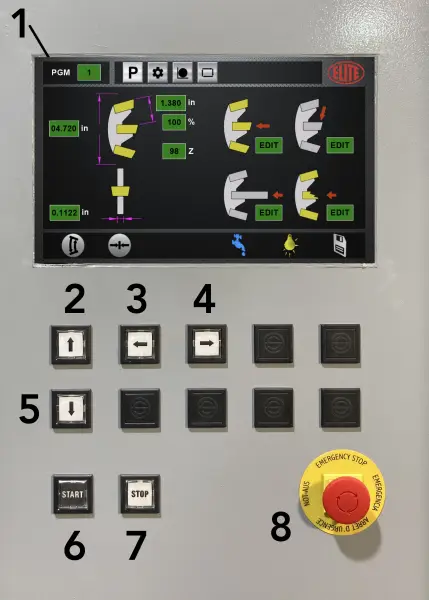
- LCD screen
- Z axis up / grinding wheel up.
- X axis left / grinding wheel left.
- X axis right / grinding wheel right.
- Z axis down / grinding wheel down.
- START button.
- STOP button.
- Emergency stop.
Control panel operation

6.STARTING UP
In this section we show you to operate the ELITE AVB 850 in order to work.
NOTE: The data that appears in the different images are by way of example, each type of tool has its recommended data and a skilled operator must know them.
Emergency stop
It's the round red button. In the event that there is a failure in use or a dangerous situation is being created, it allows the immediately disconnection of the machine.
Should not be used unless strictly necessary.
Once used, to use the machine again, you must pull it to return to the initial position, additional referencing and setting up must be needed.
WARNING: Under no circumstances should this control be modified or manipulated, this automatically puts the operator and people around him in danger of serious injury.
Sharpening operation
To start the sharpening process, you must first make sure that the emergency stop button is not activated.
DANGER: never manipulate the buttons on the control panel while changing the abrasive wheel: danger of very serious injuries. It is highly recommended to switch off and disconnect from power mains the machine when working inside the machine.
WARNING: before start to rotate the grinding wheel make sure that it is well attached to the wheel holder where it is located and that NOBODY is manipulating in the area where it rotates. UNDER NO CIRCUMSTANCES SHOULD THE WHEEL BE STARTED WHILE SOMEONE IS HANDLING IT.
AVB 850 Set up

6.1.Machine start-up and axis homing
Turn on the machine by switching the main power switch to the ON position. If the emergency stop is activated, deactivate it.
The machine screen will turn on and the green indicator light will illuminate, indicating that the machine is now operational.
Now verify that no axis is in contact with the grinding wheel before beginning the referencing process.
Then close the cabin door and press the START button. Follow the instructions displayed on the screen.
IMPORTANT: Do not open the cabin door while the machine is in the home position. If opened accidentally, turn off the machine and repeat the process.
Once the machine finishes the referencing process, it is ready for operation, and the work menu will appear on the LCD screen.

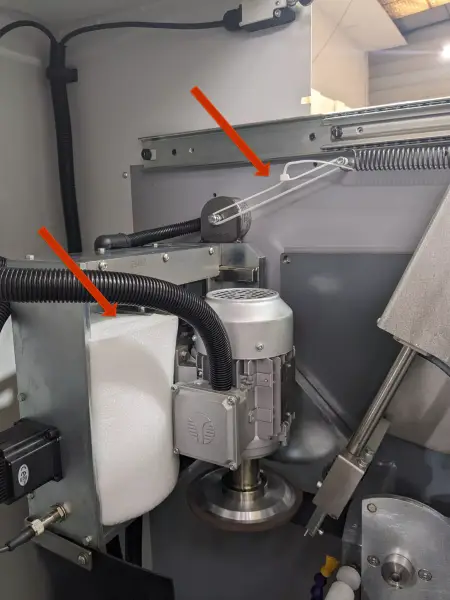
6.2.Grinding wheel replacement
Required tool: Open-end wrench size 17.
With the machine powered off, remove the hex bolt located underneath the grinding wheel. Hold the wheel and its support ring to prevent them from falling. Now insert the new grinding wheel. Reposition the locating ring correctly, ensuring the locating pin passes through it. Reinsert and tighten the hex bolt.

6.3.Saw blade holder change
The ELITE AVB 850 sharpener comes equipped with two (2) saw blade holders: one for blades up to ø850 mm and another for smaller blades <ø200 mm.
To change the holders, remove the two (2) screws and keep them. Now the holder can be removed. It’s important to ensure the centering pin remains in place. If the 10 mm centering pin becomes worn from use, it must be replaced.
Next, install the other saw blade holder and make sure to secure it again. The centering pin itself limits the maximum blade diameter.
Mounting the saw blade is the same for either holder: use a centering ring and the blade is ready to be mounted for sharpening. The machine is now ready for use.

6.4.Adjustment of the indexing cam based on saw blade diameter
Depending on the blade diameter, the indexing feed cam must be adjusted so that the indexing pawl advances the saw teeth correctly.
NOTE: To adjust the indexing feed cam, ensure the indexing pawl is in its lowest position. Otherwise, spring force may push the pin downward and the current position could be lost.

7.OPERATING THE MACHINE
7.1.Sharpening the top of the tooth
To approach the grinding wheel to the tooth top, first ensure that the correct wheel is installed for sharpening the top or outer part of the tooth. Go to the final screen of the working program and press the START button. An informational message will appear on the screen prompting you to start the wheel rotation. Press START again and the machine will move, allowing you to set the initial grinding positions.
Next, close the clamp by pressing the clamping button on the control panel (see panel diagram to locate it). Then press the feed pawl movement button to verify that you're on the correct tooth, as indicated on the setup screen. Move the indexing pin away to avoid collision with the grinding wheel.
Now, follow the on-screen instructions on the LCD menu to bring the wheel into contact with the tooth.
Use the motion buttons on the control panel to move the axis quickly, or press the menu selector once to switch to slow speed.
Start the approach at high speed. When the wheel is close, switch to low speed for a fine approach until the wheel gently touches the tooth — always using visual feedback.
Once the wheel touches the tooth, raise the grinding wheel to the starting point of the grinding phase and press START to confirm.
If needed, the machine will prepare for the second point. The LCD help menu will guide you: some saws only require a single point setup, while others may need two, depending on tooth geometry.
Tooth Top Sharpening
7.2.Sharpening the tooth face
To bring the grinding wheel close to the tooth face (the inner side of the tooth), make sure the correct face-grinding program is selected on the control panel LCD screen.
Once the correct parameters have been entered into the program, press SAVE in the LCD menu to store the settings. Then press START. A warning message will appear on the screen indicating the grinding wheel is about to start rotating (this is a safety warning). Press START again. The machine will prepare for the sharpening cycle and the grinding wheel will begin to rotate.
Now use the directional arrow buttons to move the axis at fast speed. To switch to slow speed, press the white selector once. Move the required axis accordingly.
This allows you to perform the initial approach quickly.
IMPORTANT NOTE: Make sure the clamp is closed and that the correct tooth is selected before proceeding.
Once close to the tooth, switch to slow speed using the white selector on the screen.
Gently bring the wheel into contact with the tooth, then move it to the desired stopping point on the inner part of the tooth. This will be the final grinding position.
Once the approach is complete, press START again and the grinding cycle will begin.
Tooth Face Sharpening

7.3.Shear angle grinding

7.4. Combined top and face sharpening in one setup

7.5. Variable tooth pitch
The "Tooth Pitch" mode on the ELITE AVB 850 sharpener allows for precise programming and adjustment of tooth spacing, accommodating a wide variety of pitches, including variable-pitch or special teeth. This system ensures perfect synchronization between saw feed and grinding cycle, guaranteeing consistent sharpening quality regardless of tooth design. It also significantly reduces wheel wear and improves overall grinding efficiency.

7.6. Door safety system

8.MAINTENANCE
8.1.Preventive maintenance
The maintenance of the ELITE model AVB 850 grinding machines is very simple but at the same time important.
It consists of the following:
- Cleaning of the carriage guides - Daily
- Cleaning and greasing the polished parts, in case the machine is not used for several days, to prevent oxidation.
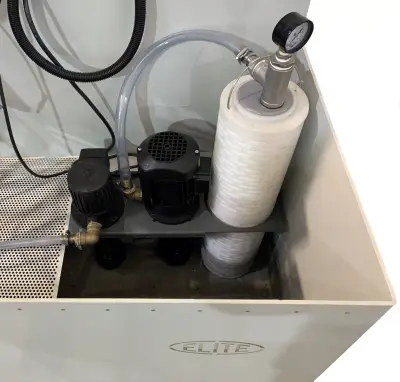
- Check the level of coolant in the coolant tank. You can use to refill the coolant the ELITE SintoCut PRO MIX. The coolant should be mixed with water between 2 and 8%. Being below it can lead to oxidation of mechanical parts and if the level is higher it can be toxic. - Monthly.
- The sludge and dirty that is deposited both in the work area and in the coolant tank must be emptied - Weekly.
- Keeping the machine clean and in good condition will allow for optimal long-term use.
Use the equipment only in dry environments. The temperature must be between 5 and 40ºC. A relative humidity greater than 90%, as well as a saline environment, would cause premature corrosion of the machine.
To lubricate the pneumatic circuit we recommend using Esso Spinesso oil.
9.ACCESSORIES AND CONSUMABLES
9.1.Grinding wheels
9.1.1.Face grinding
For face grinding use the grinding wheel ref. nr. 2132-A. 12V9 20º, D76 C125, ø175x13x2, 9x13xø32mm.
9.1.2.Top grinding
For top grinding use the grinding wheel ref. nr. 2011-B. 6A2H, D126/46 C100/75, Ø125x5x6x18ø32mm.
9.2. Saw Blade Holders
We offer saw blade holders in various sizes:
- Saw blade holder for scoring saws from ø80 to ø200 mm.
- Saw blade holder for blades from ø200 to ø450 mm.
- Saw blade holder for blades from ø400 to ø650 mm.
- Saw blade holder for blades from ø600 to ø850 mm.
9.3. Centering Rings
We offer centering rings in various sizes:
- Ring ø110/ø10 mm
- Ring ø120/ø10 mm
- Ring ø1"/ø10 mm
- Ring ø20/ø10 mm
- Ring ø3.125"/ø10 mm
- Ring ø30/ø10 mm
- Ring ø32/ø10 mm
- Ring ø35/ø10 mm
- Ring ø40/ø10 mm
- Ring ø5/8"/ø10 mm
- Ring ø50/ø10 mm
- Ring ø60/ø10 mm
- Ring ø70/ø10 mm
- Ring ø75/ø10 mm
- Ring ø80/ø10 mm
- Ring ø90/ø10 mm
- Ring ø95/ø10 mm
9.4.Coolant agents
We recommend to use ELITE SintoCut PRO MIX or equivalent to mix with water emulsion. If you prefer to grind with oil, you can use our SintoCut PRO MD. Both coolant are available in 20 liters can or 200 liters barrel.
9.5.Equipment
Additional equipment of the machine.
9.5.1.Filtering systems
Machine could be equipped with one of the following ELITE filtering systems. If your machine already has one of this systems and you need information or help, please refer to the manual of the filtering system.

9.5.1.1.FILTRAmaq UNO
Filtering system integrated in the machine to save space.
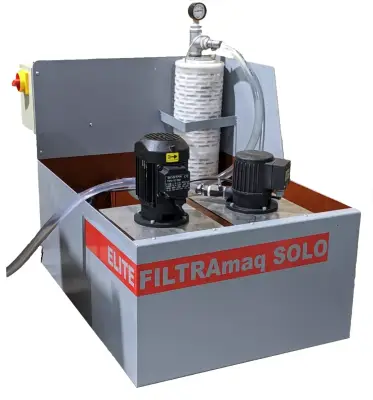
9.5.1.2.FILTRAmaq SOLO
Independent filtering system for one machine.
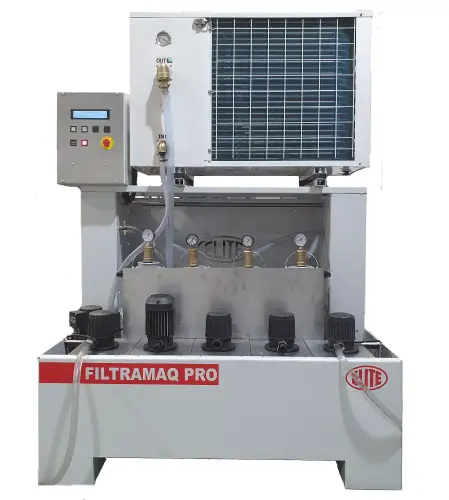
9.5.1.3.FILTRAmaq PRO
Centralized filtering system for up to 5 machines.
10.WARRANTY
All our machines are tested before being shipped. However, there can always be defects that are not observable at first sight.
Our machines are guaranteed against manufacturing or material defects under normal use and maintenance conditions.
The period of this guarantee is 12 months from the date of purchase and consists of the replacement of defective material.
The guarantee will be automatically canceled in the event of a modification outside our company. Or in manifest cases of misuse of the machine.
The guarantee does not include parts subject to normal wear due to use such as skids, lubrication cartridge, abrasives, etc.
11.DOWNLOAD MANUAL
12.FAQ
When doing face grinding, the internal or external part of the teeth removes more material
Adjust the internal part of the clamp: It is offset and makes the saw blade body not perpendicular to the grinding wheel.
The feeding pawl travel doesn't go completely down- or it goes too much down
The indexing finger, when at its down position, must have its internal bearing positioned exactly in the radius of the indexing cam. This problem can be caused by 3 reasons:
- The inductive switch used for referencing the indexing finger is miss-adjusted. Please check the position and fix it firmly.
- The driver steps are bad configured, please check the electrical diagram or ask to an Elite technician to adjust it again.
- The axis travel value entered in the configuration screen of the machine control is wrong. Please contact to an Elite technician to re-adjust it.