1. FIRST STEPS
Congratulations on your purchase of the ELITE SOLDAmaq 30/40/60 mini welding machine for bandsaws.
Read this guide before you start.
The ELITE SOLDAmaq is a band saw welding machine that allows a durable and fast welding of the bands as well as the subsequent annealing so that the weld point acquires the same properties and hardness as the rest of the band.
You can view the product catalog at the following link: ELITE model SOLDAmaq
This manual introduces you to the main functions of the welder in order to avoid risks to your health or that may cause a breakdown or premature wear of the machine.
In case of any doubt, please contact us directly or one of our authorized distributors.
Informative Note: The use described in the manual of this welder may present some variations in use since our machinery is subject to possible constructive modifications, depending on the incorporation of technological advances in our welding equipment.
2. SECURITY
2.1.Safety rules
Carefully observe and apply the following safety rules, non-observance of these rules may cause personal injury or damage to the machine itself.
The installation and maintenance of the machine described in this manual must be carried out only by operators who are familiar with its operation and have sufficient technical knowledge.
The ELITE welding machines from the SOLDAmaq 30, 40 and 60 mini model range have been designed for the sharpening of band and circular saws, excluding any other type of operation.
DANGER HIGH VOLTAGE
DANGER OF ACCIDENT

DANGER DUE TO SPARK PROJECTION

WEAR PROTECTIVE SHOES

DANGER FROM SHARP TOOLS

USE HEARING PROTECTORS
These warnings do not include all possible risks that improper use of the machine could cause. For this reason, the operator must proceed with prudence and observing the rules.
2.2.Use and storage of the instruction manual
This instruction manual must be read and understood by all personnel who come into contact with the machine.
This manual is for:
- Indicate the correct use of the machine according to the type of work to be carried out.
- Provide the necessary instructions for the transport, adjustment and maintenance of the machine.
- Facilitate the ordering of spare parts and information of risks.
Limits of use of the manual:
The machine is intended for professional use and therefore the experience of the operator is required and of vital importance.
Importance and conservation of the manual:
This manual must be considered part of the machine and must therefore be attached to it until the end of its use.
Additional information and clarifications:
The user, owner or maintenance person can contact the manufacturer to request any additional information on the use of the machine and possible modalities for maintenance and repair intervention.
Expiration of responsibility:
The manufacturer is considered exempt from any liability in the event of:
- Improper use of the machine
- Use of the machine by untrained persons
- Serious failures in scheduled maintenance
- Unauthorized interventions or modifications
- Use of non-original spare parts.
2.3.Declaration of conformity
The company hereby:
Elite Machines, SLU
Joan Oró, 27
ES-08635 Sant Esteve Sesrovires
Declares that the product indicated below, based on its conception and construction, as well as the version put on the market by our company, complies with the mandatory basic health and safety requirements of the CE directive.
This declaration loses its validity in the event of unauthorized modifications to the product.
Product name: ELITE model SOLDAmaq 30 mini
Product type: Steel band saw weldering machine
Serial No.: __
EC Directive Competences:
- EC Machinery Directive (2006/42/EC)
- European directive on electromagnetic compatibility (2014/30/EU)
- The protection purposes of the CE low voltage directive (2006/95/CE) were fulfilled according to annex I, nr. 1.5.1 of the machinery directive 2006/42/EC
The technical documentation was compiled by legal representative of the documentation:
Sergi Valls Gramunt
Joan Oró, 27
ES-08635 Sant Esteve Sesrovires
Date / manufacturer - Signature: __
Signatory data: Sergi Valls Gramunt, manager
3.TECHNICAL DATA
In the following information table, find the list of technical specifications of the welders described in this manual.
| FEATURES | |||
|---|---|---|---|
| For sharpening band saws | SOLDAmaq 30 mini | SOLDAmaq 40 mini | SOLDAmaq 60 mini |
| Band saw width | from 5 to 30mm. (0.2" to 1,18") | from 10 to 40mm. (0.39" to 1,57") | from 20 to 60mm. (0.79" to 2,36") |
| Band saw thickness | from 0.5 to 1mm. (0.02" to 0.039") | from 0.5 to 1.2mm. (0.02" to 0.047") | from 0.6 to 1.2mm. (0.023" to 0.047") |
| Max. power necessary | 4 kW. | 4.5 kW. | 6 kW. |
| Weight | 35kg | 51kg | 56kg |
All models have exactly the same operating procedure.
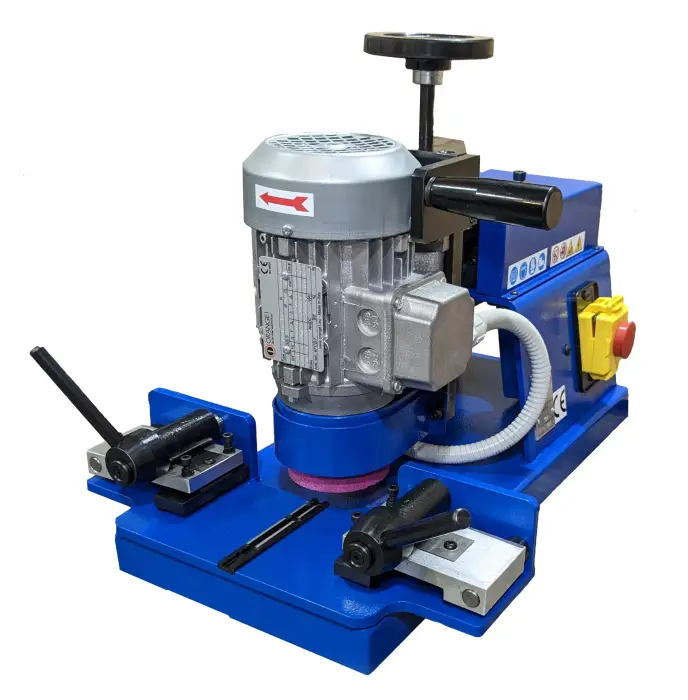
We recommend using the ELITE deburring machine model SOLDAmaq EC for quick removal of the weld seam.
4. TRANSPORTATION
The ELITE SOLDAmaq 30, 40 and 60 mini are delivered packed in a wooden box.
During all transport and transfer, the machine must be kept in its original vertical position, any variation in this position may lead to the loss of the guarantee.
| Machine model | Gross dimensions (mm) | Gross weight (kg) |
|---|---|---|
| SOLDAmaq 30 mini | 600 x 800 x 500 | 48 |
| SOLDAmaq 40 mini | 600 x 800 x 500 | 60 |
| SOLDAmaq 60 mini | 600 x 800 x 500 | 67 |
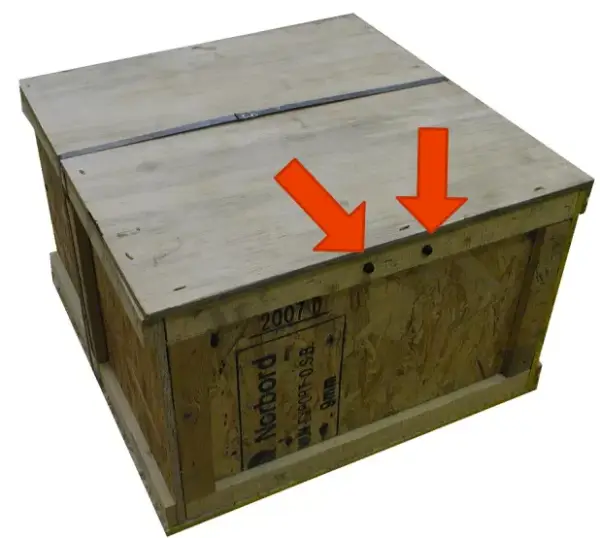
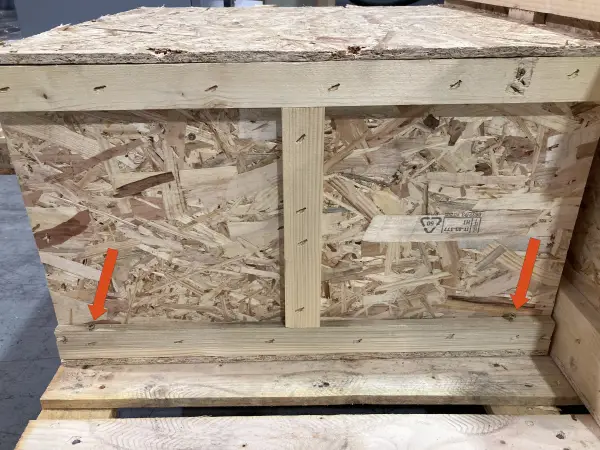
4.1.Unpacking and assembly instructions
The packaging is fixed to a pallet with screws. Remove them before attempting to move it.
To remove the machine from its packaging, first remove the shears (blue arrow), and then remove the wooden blocking pieces (red arrows).
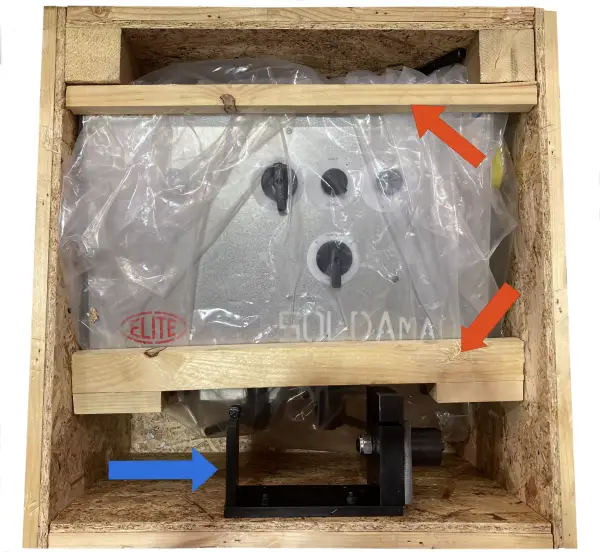
Once the machine is in its final location, you can also remove the protective film and other protections from the components, which secure and prevent the machine from moving.
5.INSTALLATION
5.1.Machine placement
Before any work, make sure that the machine is well aligned and does not oscillate at any of its ends, in which case it must be shod to prevent movement. For its correct leveling it is necessary to use a leveling tool. This control must be carried out both longitudinally and transversally.
A poor leveling of the machine can cause unwanted vibrations and premature wear of the linear guides.
ATTENTION: The machine must not be used under any circumstances by unqualified or unauthorized personnel.
5.2.Electrical connection
Remember: Before connecting the machine, remove any guards the machine may have to protect the components during transport.
DANGER HIGH VOLTAGE!
SOLDAmaq welding machines must be strictly connected to the voltage indicated in the machine order and on the machine itself. The connection to a voltage other than that indicated may cause a breakdown in the machine and represents a risk for people who use the machine.
For its connection to the electrical network, the machine requires only two phases and the ground connection.
This installation must be carried out by qualified technical personnel and checked with a voltage meter before turning on the machine.
It is absolutely essential that the cross-section of the connection cable is as required, that the machine has a dedicated socket protected against overloads and that it is as close as possible to the socket.
In case of an inadequate section of the cable, not enough current will reach the machine at the time of welding, causing a defective and extremely fragile weld. This is one of the most important points since a very high number of possible welding problems is due to this problem.
We reject any responsibility for a wrong connection.
Once the connection has been made and checked, turn the main ON/OFF switch to the ON position.

Check before start-up that the soldering iron voltmeter indicator is at the selected voltage value with a difference of no more than 5%, and that this value is stable.
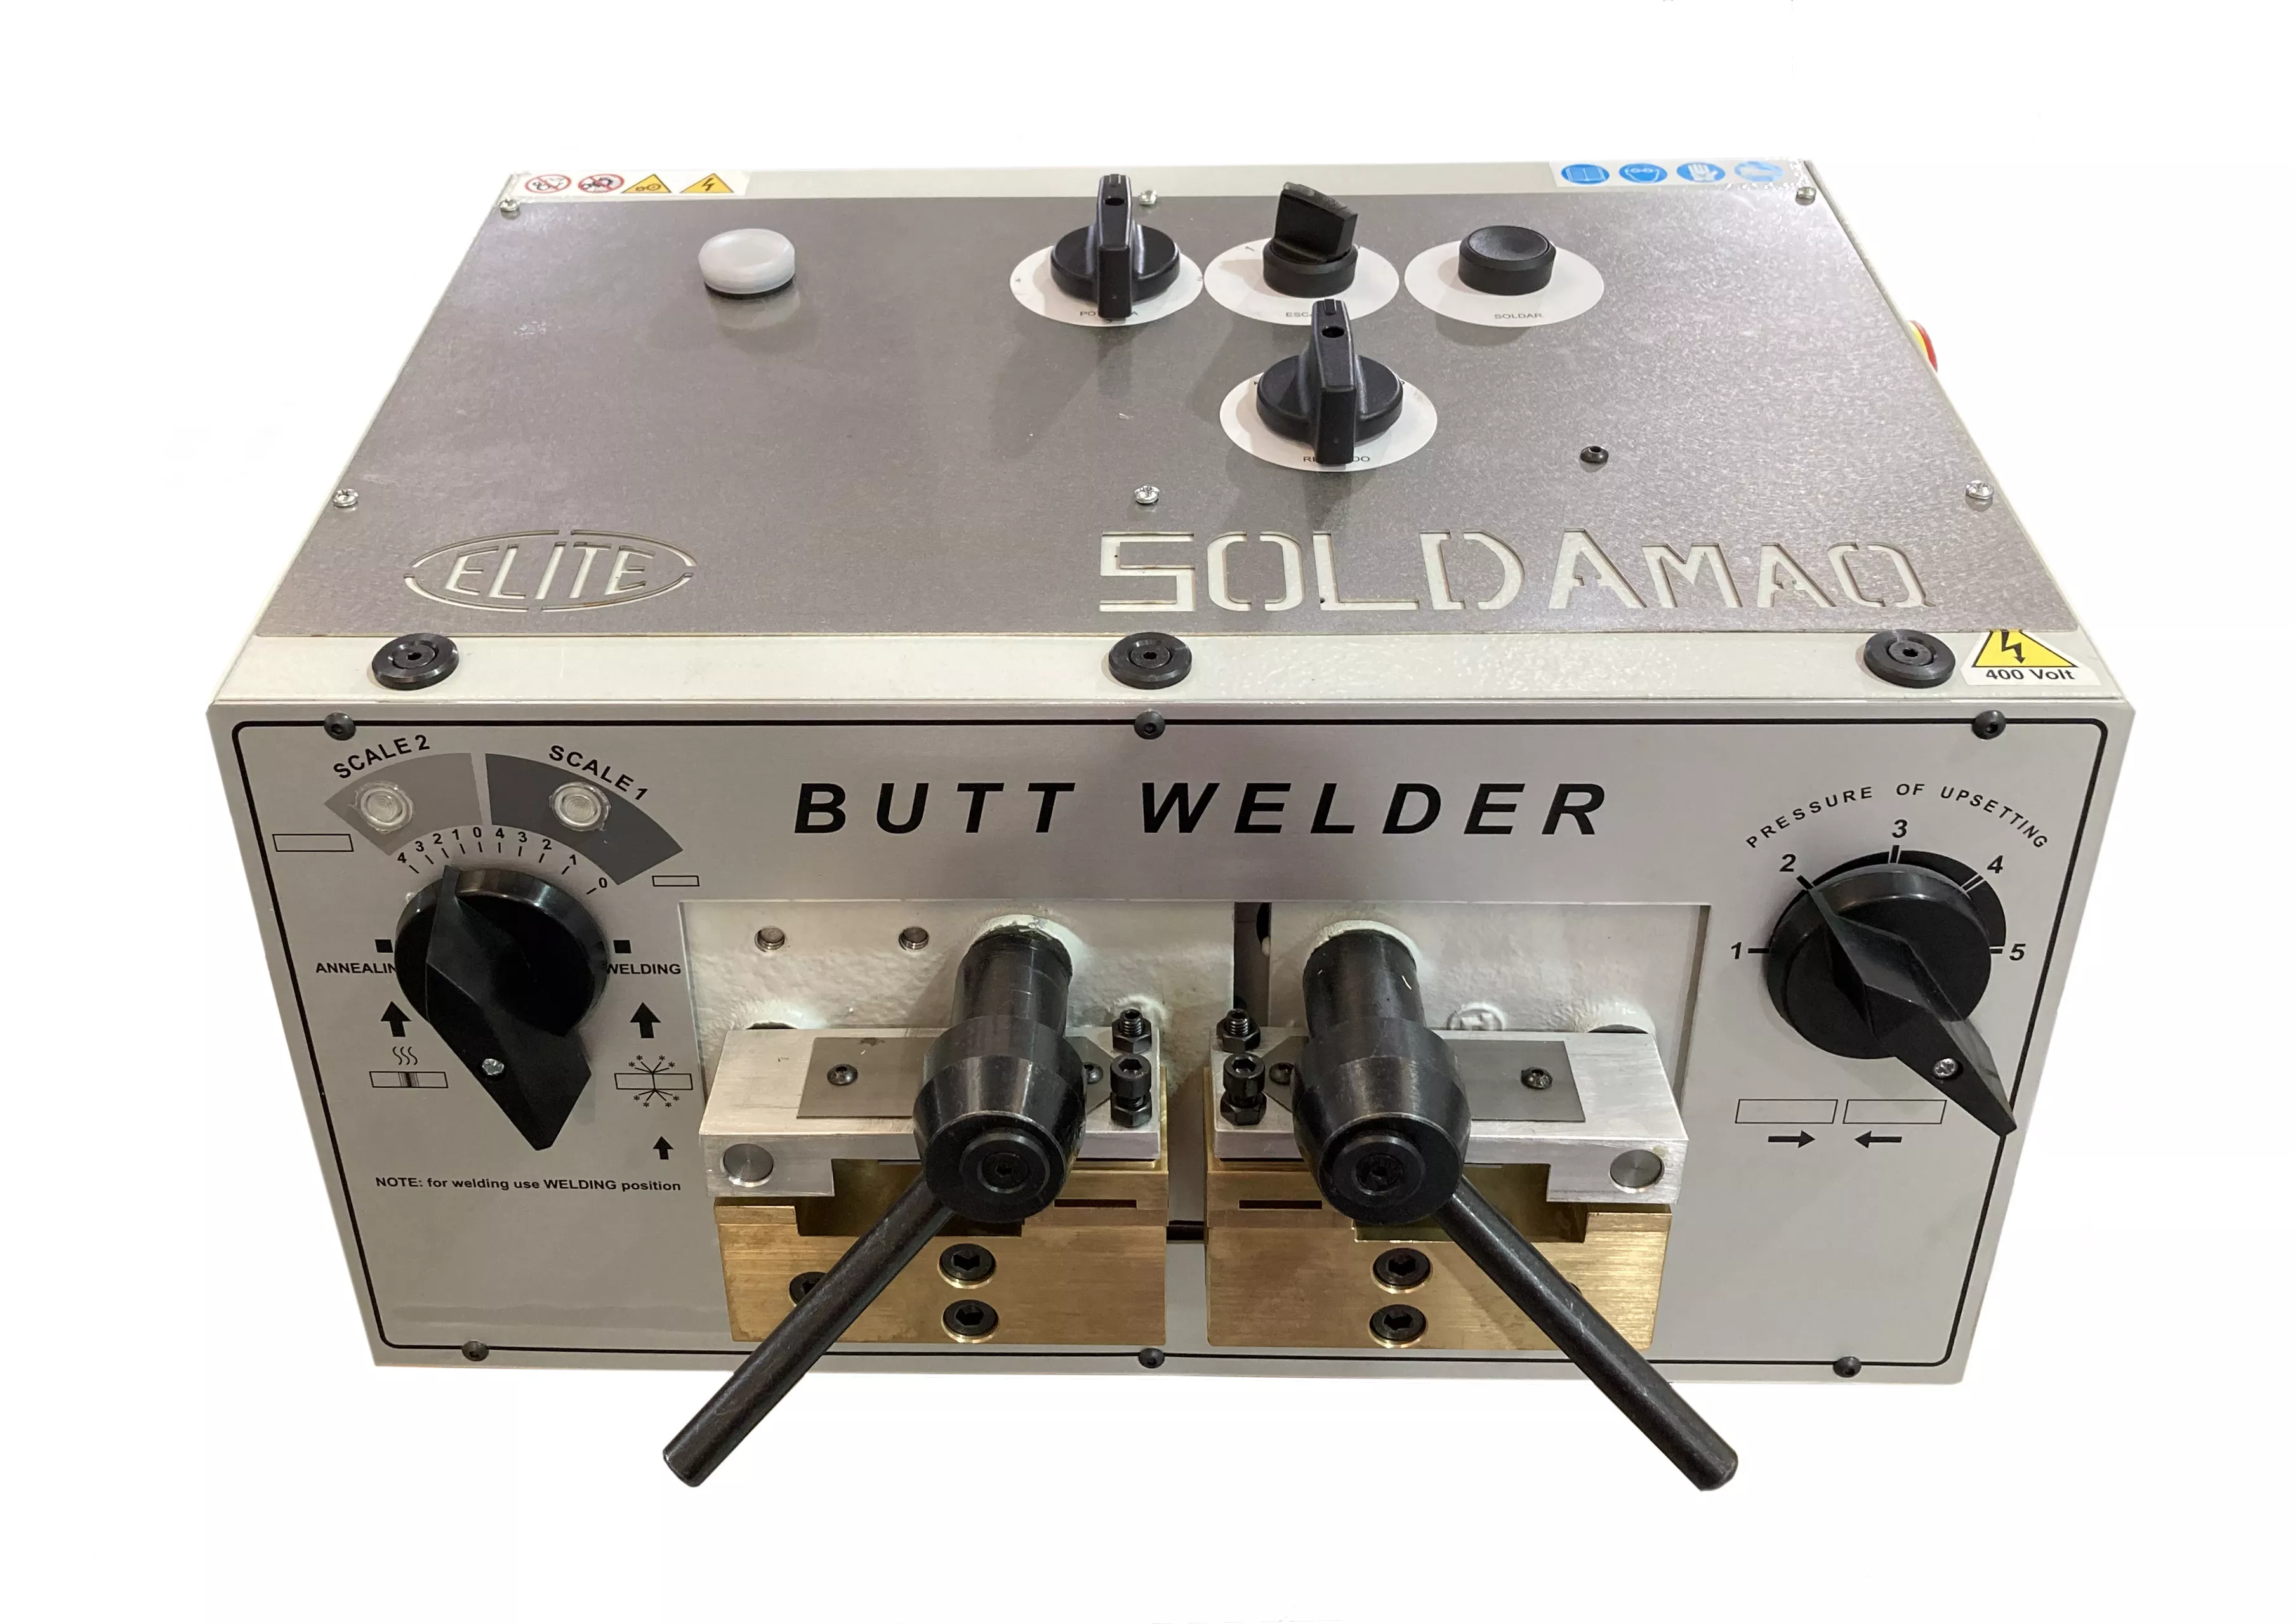
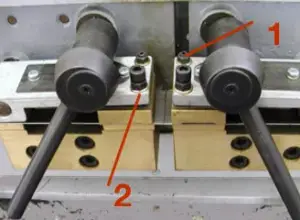
5.3.Main components of the machine
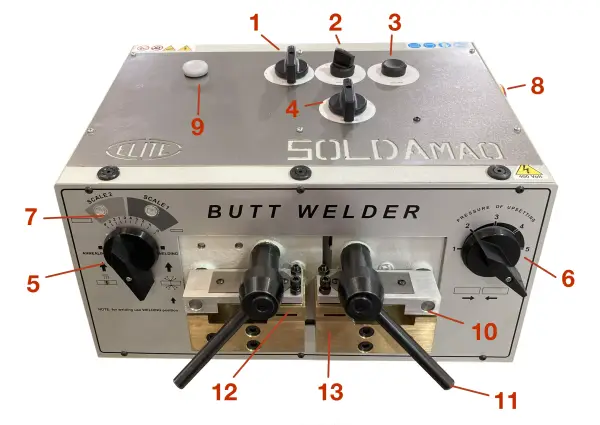
1 Welding power
2 Welding scale selector
3 Welding button
4 Annealing current knob
5 Welding or tempering path selector
6 Welding pressure
7 Scale selected indicator
8 General ON/OFF switch (Right side of the welder)
9 Machine ON Indicator Light
10 Jaw
11 Clamp lever
12 Upper electrode
13 Lower electrode
6.STARTING UP
In this section we show you how to operate the ELITE SOLDAmaq to make it work.
NOTE: The data that appears in the different images are by way of example, each type of tool has its recommended data and an expert operator should know them.
DANGER: never manipulate the buttons on the control panel while performing maintenance on the machine: danger of very serious injury. It is strongly recommended to switch off and disconnect the machine from the mains when working inside it.
6.1. Power on the machine
The SOLDAmaq welding machine has been designed for welding band saws and steel strips with the maximum dimensions described above in the technical characteristics.
The machine is built from welded and machined parts.
6.1.1.Power on
After ignition, a warning light on the control panel lights up. This lamp indicates that the welding process can be started.
6.1.2.Electrical connection
The ELITE model SOLDAmaq welders must be strictly connected to the voltage indicated in the machine order and on the machine itself. The connection to a voltage other than that indicated may cause a breakdown in the machine and represents a risk for people who use the machine.
This installation must be carried out by qualified technical personnel and checked with a voltage meter before turning on the machine.
It is absolutely essential that the cross-section of the connection cable is as required, that the machine has a dedicated outlet and is protected against overloads and shunts, and that it is as close as possible to the electrical outlet.
We reject any responsibility for a wrong connection.
Once the connection has been made and checked, turn the main ON/OFF switch to the ON position.
Elite Sharpening Machines, rejects all responsibility for a wrong connection, which in addition to causing a malfunction of the machine can harm people, animals, material objects.
7.WORK OPERATION

7.1.Cutting the band saw
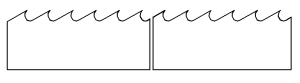
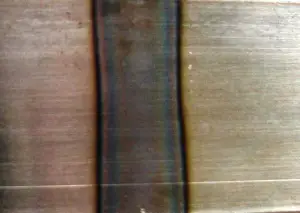
Before welding it is necessary to cut the band saw correctly: the cut must be perfectly perpendicular to 90º and without burrs.
A defective cut will imply a bad weld.
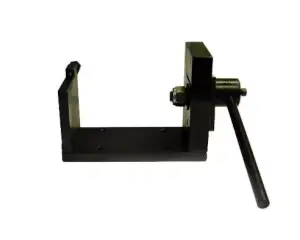
Shears:
Correct cut:

In the welding process the machine consumes a piece of the strip material (approx. 2 to 3 mm) and this depends on the welding path (selected in the welding scale setting).
This must be considered at the time of cutting the tape to preserve the original pitch of the tape.
7.2.Preparation for welding
In this section we show you how the SOLDAmaq controls work.
Indicative welding tables
Scale
This selector is used to adjust the welding route depending on the size of the tape.
It is adjustable in position 1 or 2. By changing the value to 1 or 2, the corresponding weld path light will also change.
Advice:
Scale 1: In case of small or thin strips (by thickness and width)
Scale 2: In case of larger tapes
Welding power
The welding power selector transmits more or less power to melt the tape depending on its size. It is adjustable from value 1 to 4.
The finer the saw, the smaller this value should be.
Welding pressure
Regulates the "sticking" force of the tape depending on its size. Adjustable from position 1 to 5.
The value will be smaller when the tape is smaller.
Weld path
Allows you to select, according to the scale, the amount of material that will be melted, and therefore present in the weld seam.
VERY IMPORTANT: The selected route must be appropriate for the scale in which we are working.
VERY IMPORTANT: When finishing the adjustment of the route and tightening the jaws of the tape, it must be placed in the "WELDING" position.
| ELITE SOLDAmaq 30 mini | ||||
|---|---|---|---|---|
| Sheet width | Scale | Welding power | Welding pressure | Weld path |
| 5mm. - 0.2" | 1 | 1 | 1 | 2 |
| 10mm. - 0.4" | 1 | 2 | 1 | 2 |
| 20mm. - 0.8" | 2 | 3 | 2 | 3 |
| 30mm. - 1-1/6" | 2 | 4 | 3 | 4 |
| ELITE SOLDAmaq 40 mini | ||||
|---|---|---|---|---|
| Sheet width | Scale | Welding power | Welding pressure | Weld path |
| 10mm. - 0.4" | 1 | 1 | 1 | 2 |
| 20mm. - 0.8" | 1 | 1-2 | 1-2 | 2-3 |
| 30mm. - 1-1/6" | 1-2 | 2-3 | 2-3 | 3-4 |
| 40mm. -1-1/2" | 2 | 3-4 | 3-4 | 4 |
| ELITE SOLDAmaq 60 mini | ||||
|---|---|---|---|---|
| Sheet width | Scale | Welding power | Welding pressure | Weld path |
| 20mm. - 0.8" | 1 | 1 | 1 | 3 |
| 35mm. - 1-1/3" | 2 | 3 | 2 | 3 |
| 45mm. -1.77" | 2 | 4 | 3 | 4 |
| 60mm. - 2-1/3" | 2 | 4 | 4 | 4 |
NOTE: These welding tables are indicative, the operator must adjust them as he deems necessary to adapt them to the different alloys of the strips.
We recommend following the table at first, and adjusting the values from these reference values, making only one change per test at a time to get the best possible results.
Apart from these weld values, the tempering process is critical to the life and strength of the saw.
7.3.Welding
Depending on the width and thickness of the belt, the appropriate adjustments of the machine must be carried out following the instructions in this manual.
1. Set the scale using the scale selector to value 1 or 2.
By changing the value to 1 or 2, the corresponding light will also change.
Advice:
Scale 1: In case of small or thin strips (by thickness and width)
Scale 2: In case of larger tapes
Adjust the values according to the attached table.
2. Adjust the welding power from 1 to 4.
The finer the saw, the smaller this value should be.
3. Adjust the welding pressure from 1 to 5
4. Adjust welding path
VERY IMPORTANT: The selected route must be appropriate for the scale in which we are working.
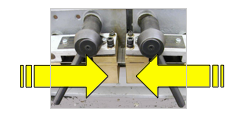
5. Place the tape between the electrodes so that the teeth of the saw face the welder and both ends are in contact and centered
Firmly lock both jaws.
6. Set the welding path selector to the WELDING position
NOTE: Check that the saw does not touch any metal part so that it does not make an arc and lose strength in the weld.
7. Press the welding button WITHOUT PRESSING UNTIL THE MACHINE STOPS
8. Loosen the jaws and set the welding travel selector to the TEMPERED position
7.4.Annealing
Annealing is the process of stabilize the welding part. As we have heated the band saw very quickly, it loses its initial properties. Therefore we must restore them again by progressively heating the tape and letting it cool slowly.
After each weld, following the steps previously described in the WELDING section, we must carry out this process.

Activate the annealing selector giving successive touches until the strip acquires a blue or dark red color.
For small tapes we will activate the selector in position 1, for large tapes in position 2.
The ribbon coloring process must start evenly from the weld bead to the electrodes. In the event that it starts first from one of the ends, the pressure of the jaws must be adjusted as indicated in the maintenance section.
NEVER COOL THE SAW WITH COMPRESSED OR BLOWING AIR, nor place the machine in places where there is a draft, it must cool itself.
To eliminate the weld seam, it can be done with a grinder or with our specialized machine for it ELITE model SOLDAmaq EC.
In any case, the tape should never change color, as this will indicate an excess of temperature when removing the bead and therefore we will modify the tempering of the tape.
To confirm that the tempering is correct, we will take the tape with both hands from about 20-30 cm. on each side from its center, when bending the saw it must present a uniform bend, if it bends at the tempering point it means that we have reached too much temperature when tempering, and therefore we have hardened the part of the weld too much.
7.5. Tips and Troubleshooting
Before reporting a malfunction of the machine, it is advisable to follow the following guide to try to solve the problem as quickly as possible.
1. Check the electrical connection: the supply voltage must be the one necessary for the machine and the voltage must be stable.
2. Perform a tempering operation on a band saw to check electrode alignment.
Correct annealing:
Incorrect annealing:

Solution: Adjust the alignment of the upper electrodes using the adjustment screws. If it is necessary to rectify the electrodes or order new ones.
NOTE: The rear adjustment screws are adjusted at the factory; it is advisable not to touch them and to carry out the entire adjustment process of the electrodes with the front screws.
- Rear adjustment screw
- Front adjustment screw
3. Problems with saw breakage due to annealing.
The annealing operation is very delicate, and its result will depend on the perfect state of the electrodes, clamps and the pressure on the belt. As well as the different alloys of the metal of the tape.
Solution: Try different annealing temperatures and times, reaching different colors on the strip.
4. If during welding the two ends are welded but mounted one on top of the other, this means that:
- Welding power is too low
- Welding pressure is too high
Incorrect welding (ends overlap):

Solution: Increase welding power or decrease welding pressure (We recommend that you make a change for each test only, in order to identify the exact cause of the problem.)
5. Defective or weak weld
The voltage and current reaching the welder from the power supply is insufficient.
- Solution: The electrical consumption of our welders is very low, however, at the precise moment of welding, a lot of power is required in a very short period of time. If the welder does not have the necessary power for welding, faulty welds will occur.
Typical cases of these problems are:
- Soldering is always defective: The cross section of the cable is insufficient or the distance to the mains connection is too long.
- The weld is defective only some times: The welder is connected to a power line that is shared with other high-power machines, when these machines have consumption peaks (machining centers, cranes, etc.), there is not enough current available to perform the weld.
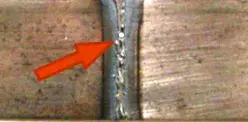
6. The weld bead is too small or there are pores in the weld:
If this happens during welding, it means that the welding power is too high or the welding pressure is too low.
It can also be produced because we do not put the welding travel selector to the WELDING position.
Solution: Increase welding power or decrease welding pressure.
Check that the welding travel selector is in the WELDING position
Incorrect welding (there are holes):
For any other type of problems, please contact us or our authorized distributors.
Please: Have detailed information of the problem, machine model and serial number ready.
7.6. Technical assistance service
At ELITE we try to satisfy our customers through reliable and easy-to-use products. However, if you experience any incident while using the machine, do not hesitate to contact us as soon as possible directly or through our authorized distributors, who will assist you, if available in your country, with better proximity and professionalism.
We wish you to enjoy this product for many years, please: when the useful life of the soldering iron ends, dispose of it correctly to the necessary organisms for its correct disposal and recycling.
8.MAINTENANCE
8.1.Preventive maintenance
Maintenance of SOLDAmaq welders is very simple. It consists of the following:
Use the equipment only in dry environments. The temperature must be between 5 and 40ºC. A relative humidity greater than 90%, as well as a saline environment, would cause premature corrosion of the machine.
Clean the electrodes each time after welding, either with compressed air or a cloth. You should only wipe it lightly, without any cleaning additives. This will greatly extend the life of the electrodes due to wear due to friction with the welding remains.
Verify that the welding input voltage is correct and does not present oscillations.
During each tempering, verify that the tempering temperature is progressively and constantly present at both ends of the saw, starting from the center of the belt.
8.2. Electric scheme
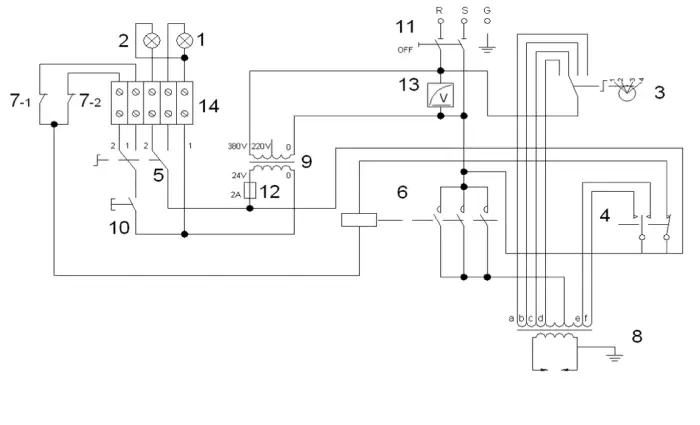
- Lamp scale 1
- Lamp scale 2
- Welding power selector
- Annealing rheostat
- Scale selector
- Welding contactor
- 1 / 7. 2 End-welding NC switch
- Power transformer
- Auxiliary transformer 24v
- Welding button
- Line selector
- Fuse
- Voltmeter
- Clamp set
8.3. Exploded view
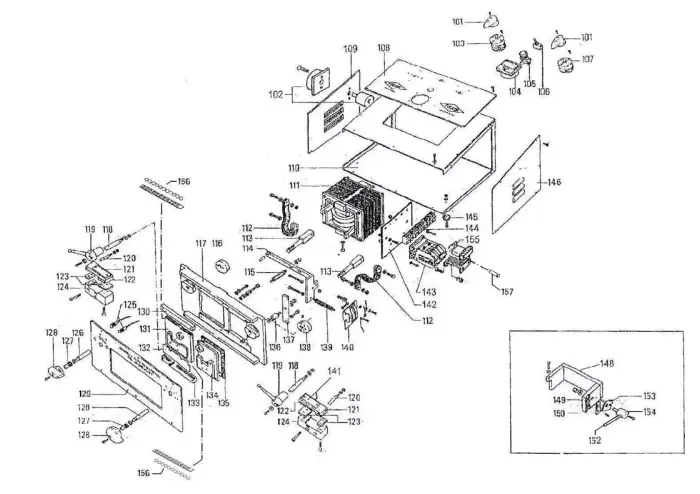
101 Knob
103 Rheostat
104 Voltmeter
105 Welding button
106 Scale selector
107 Annealing switch
108 Upper pannel
109 Left side
110 Case
111 Transformer
112 Copper plaite
113 Shaft
114 Plate
115 Support
116 Cam
117 Plate
118 Eccentrics
119 Eccentrics
120 Shaft
121 Pressor
122 Upper electrodes
123 Lower electrodes
124 Jaws
125 Lamp (2 pieces)
126 Cam shaft
127 Knob
128 Knob
129 Frontal pannel
130 Upper rail
131 Sliding carriage
132 Protection
133 Lower rail
134 Fixed carriage
135 Gasket
136 Support
137 Spring strainer
138 Cam
139 Spring
140 End-welding autoatic off-current device
141 Set elastic foils for pressor
142 Contactor support plate
143 Contactor
144 Clamp set
145 Foot
146 Right side
147 Base shear
148 Shear + Base
149 Shear body
150 Set of shear blades
151 Set of shear blades
152 Set of shear blades
153 Set of shear blades
154 Shear eccentric shaft
155 Transformer
156 Sliding carriage balls
157 Fuse
9.ACCESSORIES AND CONSUMABLES
9.1.SOLDAmaq 30 mini Lower Plates
9.2.SOLDAmaq 30 mini Upper Plates
10.WARRANTY
All our machines are tested before being shipped. However, there can always be defects that are not observable at first sight.
Our machines are guaranteed against manufacturing or material defects under normal use and maintenance conditions.
The period of this guarantee is 12 months from the date of purchase and consists of the replacement of defective material.
The guarantee will be automatically canceled in the event of a modification outside our company. Or in manifest cases of misuse of the machine.
The guarantee does not include parts subject to normal wear due to use such as skids, lubrication cartridge, abrasives, etc.
11.DOWNLOAD MANUAL
EN - User Manual SOLDAmaq30 40 60 mini.pdf
12.FAQ
Question nr1
Answer no. 1